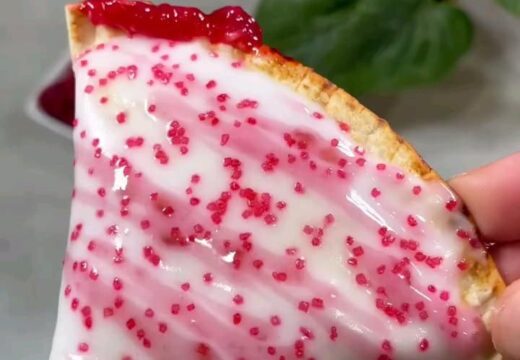
Remember tearing open that foil packet as a kid and biting into a warm, strawberry-filled rectangle? This recipe brings that memory straight into your kitchen, but with real butter, real fruit, and a glaze that actually tastes like vanilla instead of sugar paste. The pastry bakes up shatteringly flaky, the strawberry filling turns jammy and bright, and the whole thing comes together in about an hour with zero special equipment.
The secret is a cold, lightly handled dough and a filling that is thick enough to stay put. We use a simple food-processor pie dough, a quick cooked strawberry jam, and a two-step bake that keeps the edges crisp instead of soggy. You will end up with eight generously sized tarts, each one sturdy enough to hold, toast, or freeze for later.
These are also a genuinely great project to make with kids, since the assembly is basically cutting, filling, and crimping. Once you nail the technique, you can swap the strawberry jam for any fruit filling you love.
Why You'll Love This Recipe
About the Ingredients
2 1/2 cups (313g) all-purpose flour
Spoon and level the flour so you do not pack in extra. For a slightly more tender crust, swap 1/2 cup of the flour for cake flour.
1 cup (227g) cold unsalted butter, cubed
Freeze the butter for 15 minutes before cubing for the flakiest layers. Salted butter works too, just skip the added salt below.
1 tsp (6g) fine sea salt
Fine sea salt dissolves evenly into the dough. If using table salt, reduce to 3/4 teaspoon.
2 tbsp (25g) granulated sugar
A little sugar tenderizes the crust and helps it brown. Do not increase it or the dough gets sticky.
1/2 cup (120ml) ice-cold water
Add it one tablespoon at a time; you may not need all of it. Cold water keeps the butter from melting.
1 1/2 cups (about 340g) strawberry jam or fresh strawberry compote
Use a thick, seedless jam or cook down fresh berries so the filling does not leak. Raspberry or mixed berry jam is a great substitute.
1 large egg, beaten with 1 tbsp water
This egg wash seals the edges and gives the top a glossy golden finish. A splash of milk works in a pinch.
1 cup (120g) powdered sugar
Sift it first to avoid lumps in the glaze. For a thinner drizzle, add milk one teaspoon at a time.
2 tbsp (30ml) whole milk plus 1/2 tsp vanilla extract
Whole milk gives the creamiest glaze; oat milk is a fine swap. Use clear vanilla if you want a whiter glaze.
2 tbsp (14g) freeze-dried strawberry powder, optional
Crush freeze-dried strawberries in a bag for a natural pink color and real fruit flavor. Skip it for a classic white glaze.
Tips & Tricks
Keep Everything Cold
Warm butter melts into the flour and kills the flake, so chill your bowl, your water, and your hands if you run hot.
Seal the Edges Twice
Crimp with a fork, then press again with your fingers; a loose seal is the number one cause of jam leaking out in the oven.
Do Not Overfill
One level tablespoon of jam per tart is plenty; too much filling steams the crust from the inside and makes it soggy.
Vent the Tops
Poke three or four small holes in each top so steam escapes and the pastry stays flat instead of puffing into a pillow.
Pro Tips
Step-by-Step Instructions
1. Make the Dough
Pulse the flour, sugar, and salt in a food processor, then add the cold butter and pulse until the mixture looks like coarse crumbs with some pea-sized pieces left. Drizzle in the ice water one tablespoon at a time, pulsing just until the dough holds together when squeezed.
2. Chill the Dough
Divide the dough into two flat discs, wrap in plastic, and refrigerate for at least 30 minutes (or up to 2 days). Chilling relaxes the gluten and re-hardens the butter, which is what gives you flaky layers instead of a tough crust.
3. Roll and Cut
Roll one disc on a floured surface to about 1/8 inch thick, then trim into eight 3-by-4-inch rectangles, re-rolling scraps once. Repeat with the second disc so you have sixteen rectangles total, eight for the bottoms and eight for the tops.
4. Fill and Seal
Brush the edges of eight rectangles with egg wash, spoon one level tablespoon of jam into the center of each, and lay a second rectangle on top. Press the edges firmly with a fork, then crimp again with your fingers to lock in the filling.
5. Chill Before Baking
Place the assembled tarts on a parchment-lined baking sheet and freeze for 20 minutes while you preheat the oven to 375F (190C). This final chill keeps the edges sharp and prevents blowouts.
6. Bake Until Golden
Bake for 22 to 26 minutes, until the pastry is deep golden brown and the edges look dry and crisp, with jam bubbling slightly through the vents. Rotate the pan halfway through for even color.
7. Cool Completely
Transfer the tarts to a wire rack and cool for at least 30 minutes. Glazing a warm tart makes the icing run right off, so patience here really pays off.
8. Glaze and Finish
Whisk the powdered sugar, milk, vanilla, and strawberry powder until smooth, then spread about a tablespoon over each cooled tart. Let the glaze set for 15 minutes before serving or stacking.
Delicious Variations
Brown Sugar Cinnamon
Swap the jam for a paste of 3 tablespoons softened butter, 1/3 cup brown sugar, and 1 teaspoon cinnamon.
Chocolate Hazelnut
Use chocolate hazelnut spread instead of jam, and top with a simple chocolate glaze.
S'mores
Fill with marshmallow fluff and chocolate chips, then finish with a graham-cracker crumb glaze.
How to Store Homemade Strawberry Pop Tarts
Refrigerator
Store glazed tarts in an airtight container at room temperature for up to 3 days, or refrigerate for up to 1 week and let them come to room temperature before eating.
Freezer
Freeze unbaked assembled tarts on a sheet pan, then transfer to a freezer bag for up to 3 months; bake straight from frozen, adding 3 to 4 minutes. Baked tarts also freeze well for up to 2 months.
Reheating
Reheat in a 350F (175C) oven for 6 to 8 minutes to re-crisp the pastry, or pop one in the toaster on a low setting. Avoid the microwave, which makes the crust chewy.
Frequently Asked Questions
Q: Why did my homemade pop tarts leak in the oven?
The edges were not sealed tightly enough or the filling was too runny. Crimp the edges twice with a fork, use a thick jam, and chill the assembled tarts for 20 minutes before baking.
Q: Can I use store-bought pie crust instead of making dough?
Yes, refrigerated pie crust works and cuts the prep time in half. Just roll it slightly thinner, seal the edges very well, and reduce the bake time by about 3 minutes.
Q: How do I keep the bottoms from getting soggy?
Bake on parchment paper at 375F (190C) and do not overfill the tarts. A thick jam filling and a fully preheated oven keep the bottom crust crisp.
Q: Can I make these gluten-free?
Yes, use a 1-to-1 gluten-free flour blend with xanthan gum included. The dough will be a bit more delicate, so chill it well and handle it gently when sealing.
Q: How long do homemade pop tarts stay fresh?
They keep for about 3 days in an airtight container at room temperature. Refrigerate for up to a week, or freeze for up to 3 months.
Grab your rolling pin and make a batch this weekend, then tell me in the comments whether you went classic strawberry or tried one of the variations. If you bake these, snap a photo and tag me so I can see your flaky, jammy results.
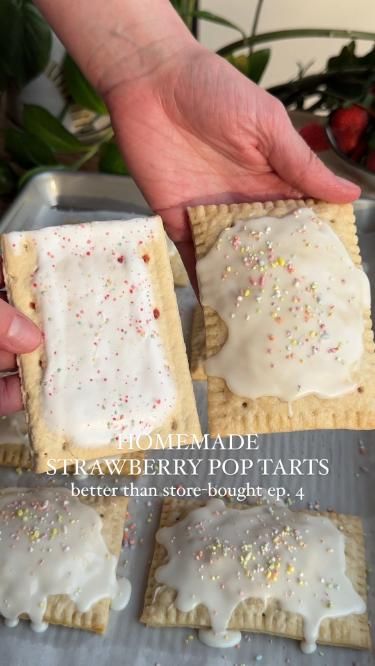
Homemade Strawberry Pop Tarts
Homemade Strawberry Pop Tarts deliver buttery, flaky pastry with jammy strawberry filling and a sweet vanilla glaze in every single bite.
🧂 Ingredients
- 2 1/2 cups (313g) all-purpose flour
- 1 cup (227g) cold unsalted butter, cubed
- 1 tsp (6g) fine sea salt
- 2 tbsp (25g) granulated sugar
- 1/2 cup (120ml) ice-cold water
- 1 1/2 cups (about 340g) strawberry jam or fresh strawberry compote
- 1 large egg, beaten with 1 tbsp water
- 1 cup (120g) powdered sugar
- 2 tbsp (30ml) whole milk plus 1/2 tsp vanilla extract
- 2 tbsp (14g) freeze-dried strawberry powder, optional
📋 Instructions
- 1Make the Dough — Pulse the flour, sugar, and salt in a food processor, then add the cold butter and pulse until the mixture looks like coarse crumbs with some pea-sized pieces left. Drizzle in the ice water one tablespoon at a time, pulsing just until the dough holds together when squeezed.
- 2Chill the Dough — Divide the dough into two flat discs, wrap in plastic, and refrigerate for at least 30 minutes (or up to 2 days). Chilling relaxes the gluten and re-hardens the butter, which is what gives you flaky layers instead of a tough crust.
- 3Roll and Cut — Roll one disc on a floured surface to about 1/8 inch thick, then trim into eight 3-by-4-inch rectangles, re-rolling scraps once. Repeat with the second disc so you have sixteen rectangles total, eight for the bottoms and eight for the tops.
- 4Fill and Seal — Brush the edges of eight rectangles with egg wash, spoon one level tablespoon of jam into the center of each, and lay a second rectangle on top. Press the edges firmly with a fork, then crimp again with your fingers to lock in the filling.
- 5Chill Before Baking — Place the assembled tarts on a parchment-lined baking sheet and freeze for 20 minutes while you preheat the oven to 375F (190C). This final chill keeps the edges sharp and prevents blowouts.
- 6Bake Until Golden — Bake for 22 to 26 minutes, until the pastry is deep golden brown and the edges look dry and crisp, with jam bubbling slightly through the vents. Rotate the pan halfway through for even color.
- 7Cool Completely — Transfer the tarts to a wire rack and cool for at least 30 minutes. Glazing a warm tart makes the icing run right off, so patience here really pays off.
- 8Glaze and Finish — Whisk the powdered sugar, milk, vanilla, and strawberry powder until smooth, then spread about a tablespoon over each cooled tart. Let the glaze set for 15 minutes before serving or stacking.