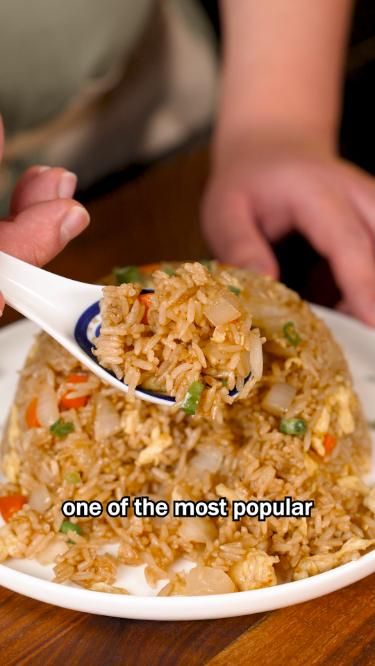
This easy egg fried rice earns a permanent spot in my weekly rotation because it turns leftover rice into a takeout-style dinner in less time than delivery takes to arrive.
The secret is cold, day-old rice and high heat. Fresh rice steams and clumps, but chilled rice grains stay separate and toast up golden in the pan, so every bite tastes like the foil container you used to fight over.
I keep the seasoning simple, just soy sauce, a little sesame oil and a pat of butter at the end, and I stir the eggs in last so they stay soft and bright yellow instead of drying out.
Why You'll Love This Recipe
About the Ingredients
4 cups (600g) cold cooked long-grain rice, day-old is best
Spread fresh rice on a tray and chill it uncovered for 1 hour if you do not have leftovers. Jasmine or plain white rice both work; avoid hot, freshly cooked rice, which steams and clumps.
3 large eggs, beaten with a pinch of salt
No eggs? Use 6 tablespoons of beaten egg substitute or 1 cup of diced firm tofu for a similar texture and protein.
3 tablespoons neutral oil, such as canola or peanut
Peanut oil gives the most authentic takeout aroma; vegetable oil is a fine everyday swap. Avoid olive oil, which smokes at this heat.
3 scallions, whites and greens sliced separately
The white parts go in first for sweetness and the greens finish the dish. A small diced onion can stand in for the whites if scallions are out of season.
1 cup (130g) frozen peas and carrots, thawed and patted dry
Pat them dry so they sear instead of steaming. Swap in diced leftover broccoli, corn or green beans, but cook raw vegetables briefly first.
3 tablespoons soy sauce
Use regular soy sauce, not dark soy, which is too strong here. For a gluten-free version, choose tamari and check the label.
1 teaspoon toasted sesame oil
A little goes a long way for that takeout flavor. If yours smells bitter or flat, it has gone rancid; buy a small fresh bottle.
1 tablespoon unsalted butter
The butter is my little secret for a richer, restaurant-style finish. Skip it for a dairy-free version and add an extra teaspoon of sesame oil.
1/2 teaspoon white pepper
White pepper is the classic Chinese takeout spice; black pepper works but tastes sharper. Add a pinch of MSG or a teaspoon of oyster sauce if you like.
Tips & Tricks
Use cold rice, always
Hot or fresh rice releases steam and turns gummy, so chill cooked rice uncovered for at least an hour before frying.
Do not crowd the pan
If your skillet is smaller than 12 inches, fry the rice in two batches so it sears golden instead of steaming pale.
Dry your vegetables
Pat thawed peas and carrots dry with a paper towel; wet vegetables drop the pan temperature and make the rice soggy.
Season at the end
Add soy sauce only after the rice is toasted, so it glazes the grains instead of burning on the hot pan bottom.
Pro Tips
Step-by-Step Instructions
1. Heat the skillet
Set a 12-inch skillet or wok over medium-high heat for 3 to 4 minutes until a drop of water sizzles and evaporates instantly, roughly 400°F (205°C) at the surface. Add 2 tablespoons of the oil and swirl to coat.
2. Scramble the eggs
Pour in the beaten eggs and let them set for 20 seconds, then push them gently with a spatula for 45 to 60 seconds until softly scrambled and still glossy, not dry. Slide them onto a plate.
3. Sizzle the aromatics
Add the remaining 1 tablespoon oil, then the scallion whites and peas and carrots. Stir for 1 to 2 minutes at 400°F (205°C) until the scallions smell sweet and the carrots look glossy at the edges.
4. Toast the rice
Add the cold rice, breaking up any clumps with your hands as you go. Press it into an even layer and let it sit undisturbed for 2 minutes, then toss and repeat for 5 to 6 minutes total until the grains look dry and lightly golden in spots.
5. Season the rice
Drizzle the soy sauce and white pepper around the edge of the pan, not in the center, then toss for 30 to 45 seconds until every grain is evenly coated and the pan smells nutty, not burnt.
6. Fold in eggs and finish
Return the eggs, breaking them into bite-size pieces, and toss for 30 seconds. Turn off the heat, then stir in the butter, sesame oil and scallion greens until the butter melts and the rice glistens.
7. Taste and serve
Taste and add a splash more soy sauce if needed, then serve hot straight from the pan. The rice should be hot throughout, about 165°F (74°C) in the center.
Delicious Variations
Chicken Fried Rice
Stir in 1 1/2 cups of diced cooked chicken with the rice and add an extra splash of soy sauce.
Shrimp and Egg Fried Rice
Sear 8 ounces of peeled shrimp in the hot pan for 2 minutes per side before the eggs, then set aside and fold back in at the end.
Kimchi Fried Rice
Swap the peas and carrots for 1 cup of chopped kimchi and add a teaspoon of gochujang for a spicy, tangy twist.
How to Store Easy Egg Fried Rice Just Like Chinese Takeout
Refrigerator
Store in an airtight container for up to 3 days; cool it within 2 hours of cooking for food safety.
Freezer
Freeze in single portions for up to 1 month, pressing out air, and thaw overnight in the fridge.
Reheating
Reheat in a hot skillet over medium-high heat, about 375°F (190°C), with a teaspoon of oil for 3 to 4 minutes, or microwave covered with a damp paper towel until steaming hot.
Frequently Asked Questions
Q: Why is my fried rice mushy?
Your rice was too wet or too fresh. Cooked rice holds a lot of moisture, so chill it uncovered for at least an hour, or use day-old rice, and pat any thawed vegetables dry before frying. A very hot pan also helps steam escape instead of soaking back into the grains.
Q: Can I make egg fried rice without day-old rice?
Yes, but dry fresh rice first. Spread just-cooked rice on a sheet pan in a thin layer and refrigerate it uncovered for 1 hour, which mimics the firm texture of day-old rice. Do not skip this step, or the rice will clump.
Q: What kind of rice is best for fried rice?
Long-grain rice such as jasmine or standard white rice works best because the grains stay separate. Short-grain or sushi rice is stickier and tends to clump, so save it for other dishes.
Q: How do I keep the eggs from drying out?
Scramble the eggs first over medium-high heat for under a minute, then remove them before they fully set. Fold them back in at the very end, off the heat, so they finish cooking gently in the warm rice.
Q: Is egg fried rice healthy?
It can be a balanced meal in moderation, since eggs add protein and the vegetables add fiber. This version has about 285 calories per serving, and you can lower the sodium by using a low-sodium soy sauce.
Give this easy egg fried rice a try on your next busy night and see how fast it disappears from the pan. Cook it your way, and tell me how it went.
Easy Egg Fried Rice Just Like Chinese Takeout
Make Easy Egg Fried Rice Just Like Chinese Takeout at home in 20 minutes, with fluffy scrambled eggs, crisp vegetables and savory soy butter flavor.
🧂 Ingredients
- 4 cups (600g) cold cooked long-grain rice, day-old is best
- 3 large eggs, beaten with a pinch of salt
- 3 tablespoons neutral oil, such as canola or peanut
- 3 scallions, whites and greens sliced separately
- 1 cup (130g) frozen peas and carrots, thawed and patted dry
- 3 tablespoons soy sauce
- 1 teaspoon toasted sesame oil
- 1 tablespoon unsalted butter
- 1/2 teaspoon white pepper
📋 Instructions
- 1Heat the skillet — Set a 12-inch skillet or wok over medium-high heat for 3 to 4 minutes until a drop of water sizzles and evaporates instantly, roughly 400°F (205°C) at the surface. Add 2 tablespoons of the oil and swirl to coat.
- 2Scramble the eggs — Pour in the beaten eggs and let them set for 20 seconds, then push them gently with a spatula for 45 to 60 seconds until softly scrambled and still glossy, not dry. Slide them onto a plate.
- 3Sizzle the aromatics — Add the remaining 1 tablespoon oil, then the scallion whites and peas and carrots. Stir for 1 to 2 minutes at 400°F (205°C) until the scallions smell sweet and the carrots look glossy at the edges.
- 4Toast the rice — Add the cold rice, breaking up any clumps with your hands as you go. Press it into an even layer and let it sit undisturbed for 2 minutes, then toss and repeat for 5 to 6 minutes total until the grains look dry and lightly golden in spots.
- 5Season the rice — Drizzle the soy sauce and white pepper around the edge of the pan, not in the center, then toss for 30 to 45 seconds until every grain is evenly coated and the pan smells nutty, not burnt.
- 6Fold in eggs and finish — Return the eggs, breaking them into bite-size pieces, and toss for 30 seconds. Turn off the heat, then stir in the butter, sesame oil and scallion greens until the butter melts and the rice glistens.
- 7Taste and serve — Taste and add a splash more soy sauce if needed, then serve hot straight from the pan. The rice should be hot throughout, about 165°F (74°C) in the center.

Mireille writes about weeknight cooking built around what is already in the pantry, with a focus on Haitian and Caribbean home dishes made simpler for busy kitchens. She favors short ingredient lists, honest substitutions, and recipes that forgive a missed step. Her angle is feeding a household well without a second trip to the store.